> ## Documentation Index
> Fetch the complete documentation index at: https://danswer-docs-versions-opensearch-example.mintlify.site/llms.txt
> Use this file to discover all available pages before exploring further.
# Jira
> Access issues and projects from Jira
## How it works
The Jira connector pulls in all tickets from the specified projects every **10** minutes.
For every Jira issue, this connector pulls:
* Title
* Description
* [Common fields](#indexed-metadata)
* Comments
The connector can index only the content that its Jira account can access.
An API token does not give its owner additional Jira permissions.
## Jira Cloud setup
Jira Cloud is hosted and updated by Atlassian. Its site URL usually ends in `atlassian.net`.
If your organization manages its Jira deployment and version, use the [Jira Data Center setup](#jira-data-center-setup).
### 1. Choose a connector account
Use a dedicated Jira account for the connector.
This makes its access easier to review and prevents a personal account change from stopping the connector.
Create the account or choose an existing account before you grant access or create the API token.
### 2. Learn where to check and grant access
The connector indexes only the projects, issues, and comments that its Jira account can access.
Use the checks below to troubleshoot missing content or grant the permission sync access in step 4.
Ask a Jira administrator to complete these steps while signed in to Jira:
Go to **Settings > System > Global permissions**.
This page shows which users and groups have each global permission. Use **Grant permission** to add a user or group.
You can also add the connector account to a group that already has the permission.
See Atlassian's [global permission
instructions](https://support.atlassian.com/jira-cloud-administration/docs/view-grant-revoke-global-permissions-in-jira/).
Go to **Settings > System > Admin Helper > Permission Helper**. Enter the connector account, a representative issue,
and the permission that you want to check.
To grant a missing permission, update the project's permission scheme. Grant it to the account, one of its groups,
or one of its project roles. Repeat the check for each permission scheme and issue security level in use.
See Atlassian's [Permission Helper
instructions](https://support.atlassian.com/jira-cloud-administration/docs/check-a-users-access-from-a-work-item/).
In the project's sidebar, go to **Space settings > Access**. Add the connector account and assign its role.
Review the project's access level and each role that can view issues.
See Atlassian's [team-managed access
instructions](https://support.atlassian.com/jira-software-cloud/docs/manage-how-people-access-your-team-managed-project/).
Sign in as the connector account.
Confirm that it can open representative issues and comments from each restriction type that you want to index.
### 3. Grant indexing access
For indexing without permission sync, the Jira account needs:
* Jira product access.
* **Browse Projects** for every company-managed project that you want to index.
* A role that can view issues in every team-managed project that you want to index.
* Access to each issue security level used by the indexed issues.
* Access to each restricted comment that you want to index.
Jira omits projects, issues, and comments that the account cannot access.
A standard Jira user can run the connector if the user has all required access.
### 4. Add permission sync access
Onyx treats everything inside a Jira project as accessible to everyone who can see the project.
It does not sync Jira issue security levels or restricted comment visibility.
Do not enable permission sync for projects that use these restrictions.
Grant all indexing access from the previous step. Then grant one of these administrative access options:
* **Administer Jira** globally.
* **Administer Projects** in every indexed company-managed project and the **Administrator** role in every indexed
team-managed project.
If the account does not have **Administer Jira**, you must also grant the global **Browse users and groups** permission.
Onyx uses this access to read permission schemes, project roles, users, groups, and group membership.
**Administer Jira** does not always grant access to issue content. Grant and test the indexing access separately.
### 5. Create the API token
Create an API token from the connector account.
Follow Atlassian's [API token
instructions](https://support.atlassian.com/atlassian-account/docs/manage-api-tokens-for-your-atlassian-account/).
If you create a token with scopes, enable **Using scoped token** when you configure the connector in Onyx.
For indexing, grant the token the `read:jira-work` scope. For permission sync,
also grant `read:jira-user` and `manage:jira-configuration`. Alternatively,
grant the complete granular read scopes listed for these Jira APIs:
* [Issue search and fetch](https://developer.atlassian.com/cloud/jira/platform/rest/v3/api-group-issues/)
* [Project permission schemes](https://developer.atlassian.com/cloud/jira/platform/rest/v3/api-group-project-permission-schemes/)
* [Project roles](https://developer.atlassian.com/cloud/jira/platform/rest/v3/api-group-project-roles/)
* [Groups and group members](https://developer.atlassian.com/cloud/jira/platform/rest/v3/api-group-groups/)
Token scopes limit the token. They do not replace the connector account access from the previous steps.
## Jira Data Center setup
These instructions apply to Jira Data Center 9 through 11.
### 1. Choose a connector account
Use a dedicated Jira account for the connector.
This makes its access easier to review and prevents a personal account change from stopping the connector.
Create the account or choose an existing account before you grant access or create the personal access token.
### 2. Learn where to check and grant access
The connector indexes only the projects, issues, and comments that its Jira account can access.
Use the checks below to troubleshoot missing content or grant the permission sync access in step 4.
Ask a Jira administrator to complete these steps while signed in to Jira:
Go to **Administration > System > Global permissions**. Data Center grants global permissions to groups,
not individual accounts. Grant a permission to a group, then add the connector account to that group.
See Atlassian's [global permission
instructions](https://confluence.atlassian.com/adminjiraserver/managing-global-permissions-938847142.html).
Go to **Administration > System**, then select **Permission helper** in the left panel. Enter the connector account,
a representative issue, and the permission that you want to check.
To grant a missing permission, update the project's permission scheme.
Grant it to one of the account's groups or project roles.
Repeat the check for each permission scheme and issue security level in use.
See Atlassian's [Permission Helper
instructions](https://confluence.atlassian.com/adminjiraserver/jira-admin-helper-938847791.html).
Sign in as the connector account.
Confirm that it can open representative issues and comments from each restriction type that you want to index.
### 3. Grant indexing access
For indexing without permission sync, grant the connector account:
* Jira product access.
* **Browse Projects** for every project that you want to index.
* Access to each issue security level used by the indexed issues.
* Access to each restricted comment that you want to index.
Jira omits projects, issues, and comments that the account cannot access.
A standard Jira user can run the connector if the user has all required access.
### 4. Add permission sync access
Onyx treats everything inside a Jira project as accessible to everyone who can see the project.
It does not sync Jira issue security levels or restricted comment visibility.
Do not enable permission sync for projects that use these restrictions.
Grant all indexing access from the previous step.
Then add the connector account to a group with one of these global permissions:
* **Jira administrators**
* **Jira System administrators**
Data Center requires this administrative access to read group membership. Onyx uses it to read permission schemes,
project roles, users, groups, and group membership.
### 5. Create the personal access token
Create a personal access token from the connector account.
Follow Atlassian's [Jira Data Center token
instructions](https://confluence.atlassian.com/enterprise/using-personal-access-tokens-1026032365.html).
The token has the same access as its Jira account.
Jira Data Center personal access tokens do not use Jira Cloud API scopes.
## Permission sync limitations
Review these limitations before you enable permission sync:
* Onyx maps Jira users to Onyx users by email address. Jira Cloud profile visibility can hide `emailAddress`, even
from an administrator's API token. Jira Data Center can also hide or mask user email addresses. A missing, hidden,
or masked email prevents Onyx from mapping that user.
Review Atlassian's [profile visibility
documentation](https://developer.atlassian.com/cloud/jira/platform/profile-visibility/)
and [Data Center email visibility
settings](https://confluence.atlassian.com/adminjiraserver0912/configuring-jira-application-options-1346048127.html).
* Onyx supports static **Browse Projects** grants to users, groups, and project roles. Dynamic grants such as
Reporter, Assignee, Project Lead, and custom user fields cannot map to a static Onyx access list.
* Onyx treats Jira's **Anyone** and **Application access** grants as accessible to all Onyx users.
Jira application access normally includes only licensed Jira users.
This mapping can give access to Onyx users who cannot access Jira.
* Permission sync requests up to 9,999 Jira groups visible to the connector account.
Jira can apply a lower limit, so large sites might not sync every group.
* Jira Cloud API tokens expire after 1 to 365 days. Rotate the token before it expires.
## Configure the connector
Go to the Admin Panel and select the **Jira** connector.
Select **Create New**. For Jira Cloud, enter the connector account's email address and API token.
For Jira Data Center, leave the email field empty and enter the personal access token.
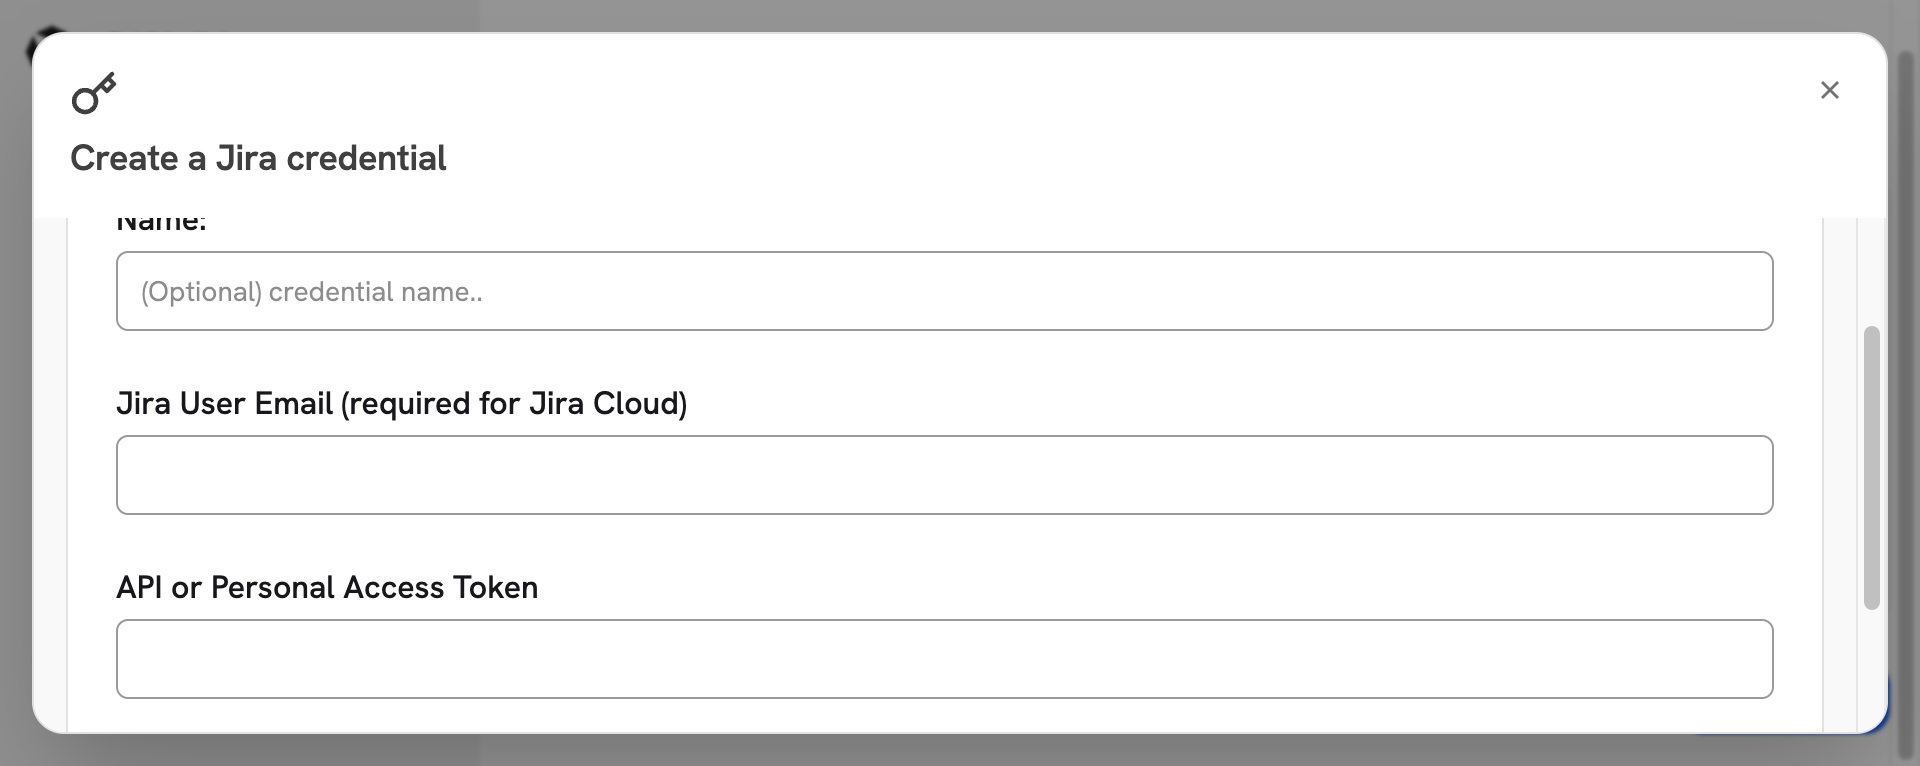 Select **Create**, select the credential, and select **Continue**.
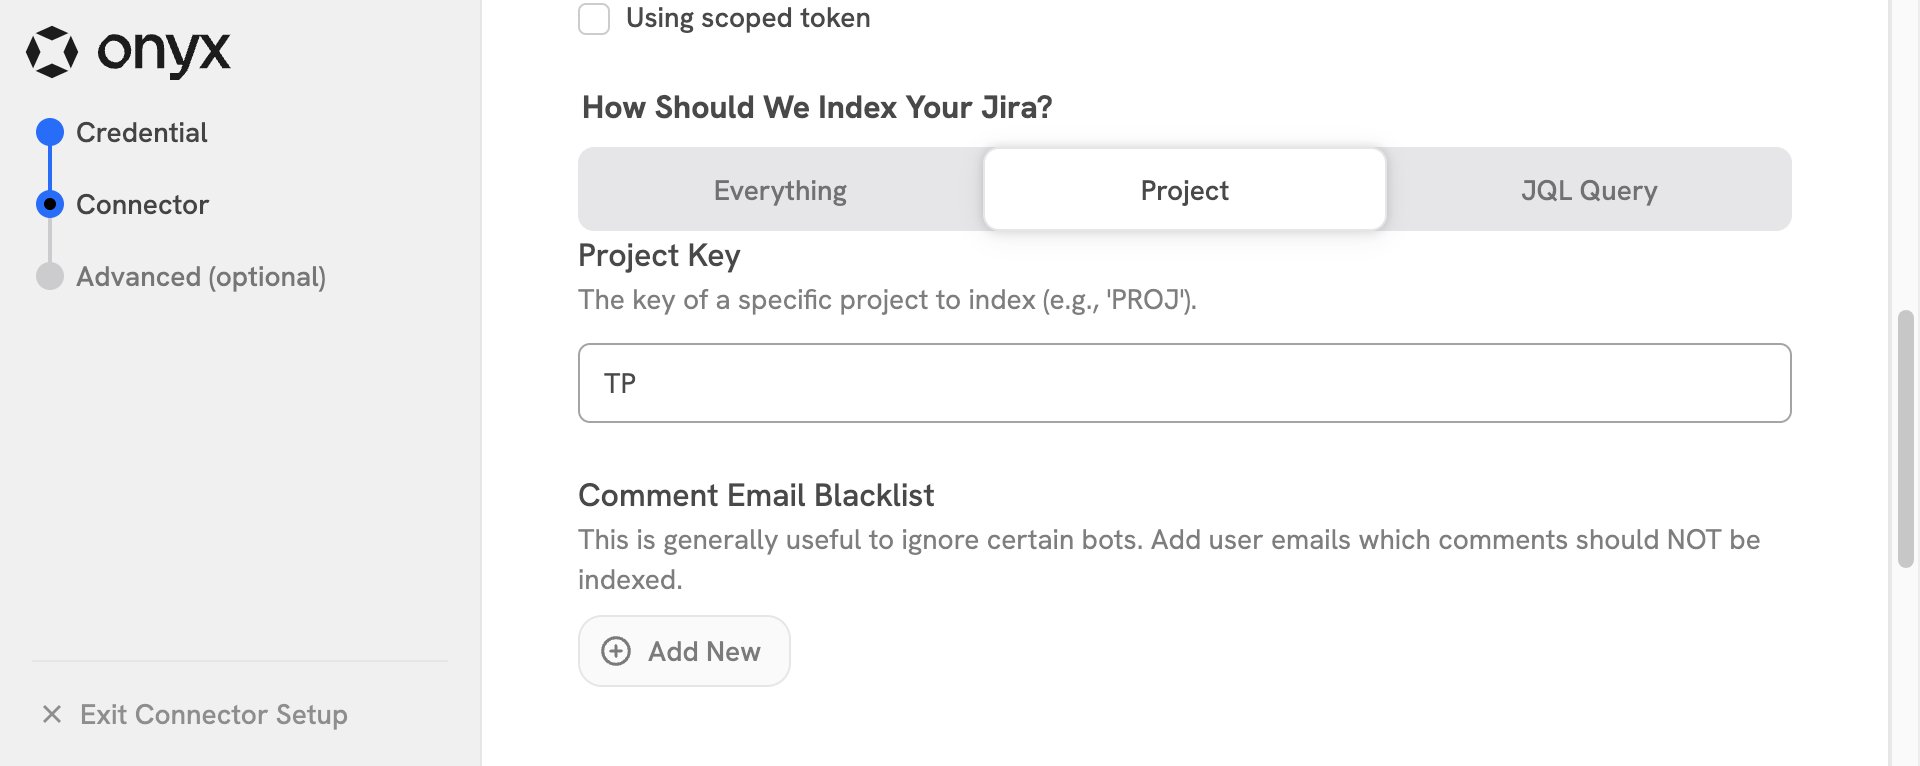
Enter a connector name and the Jira base URL. For Jira Cloud,
the base URL is usually `https://your-domain.atlassian.net`.
Enable **Using scoped token** if you created a Jira Cloud token with scopes.
Select one indexing mode:
* **Everything** indexes all issues that the connector account can access.
* **Project** indexes one Jira project. Enter its project key, such as `PROJ`.
* **JQL Query** indexes issues that match a custom JQL query.
Do not include time filters or an `ORDER BY` clause.
To exclude comments from specified accounts, add their email addresses to **Comment Email Blacklist**.
Select **Create**, select the credential, and select **Continue**.
Enter a connector name and the Jira base URL. For Jira Cloud,
the base URL is usually `https://your-domain.atlassian.net`.
Enable **Using scoped token** if you created a Jira Cloud token with scopes.
Select one indexing mode:
* **Everything** indexes all issues that the connector account can access.
* **Project** indexes one Jira project. Enter its project key, such as `PROJ`.
* **JQL Query** indexes issues that match a custom JQL query.
Do not include time filters or an `ORDER BY` clause.
To exclude comments from specified accounts, add their email addresses to **Comment Email Blacklist**.
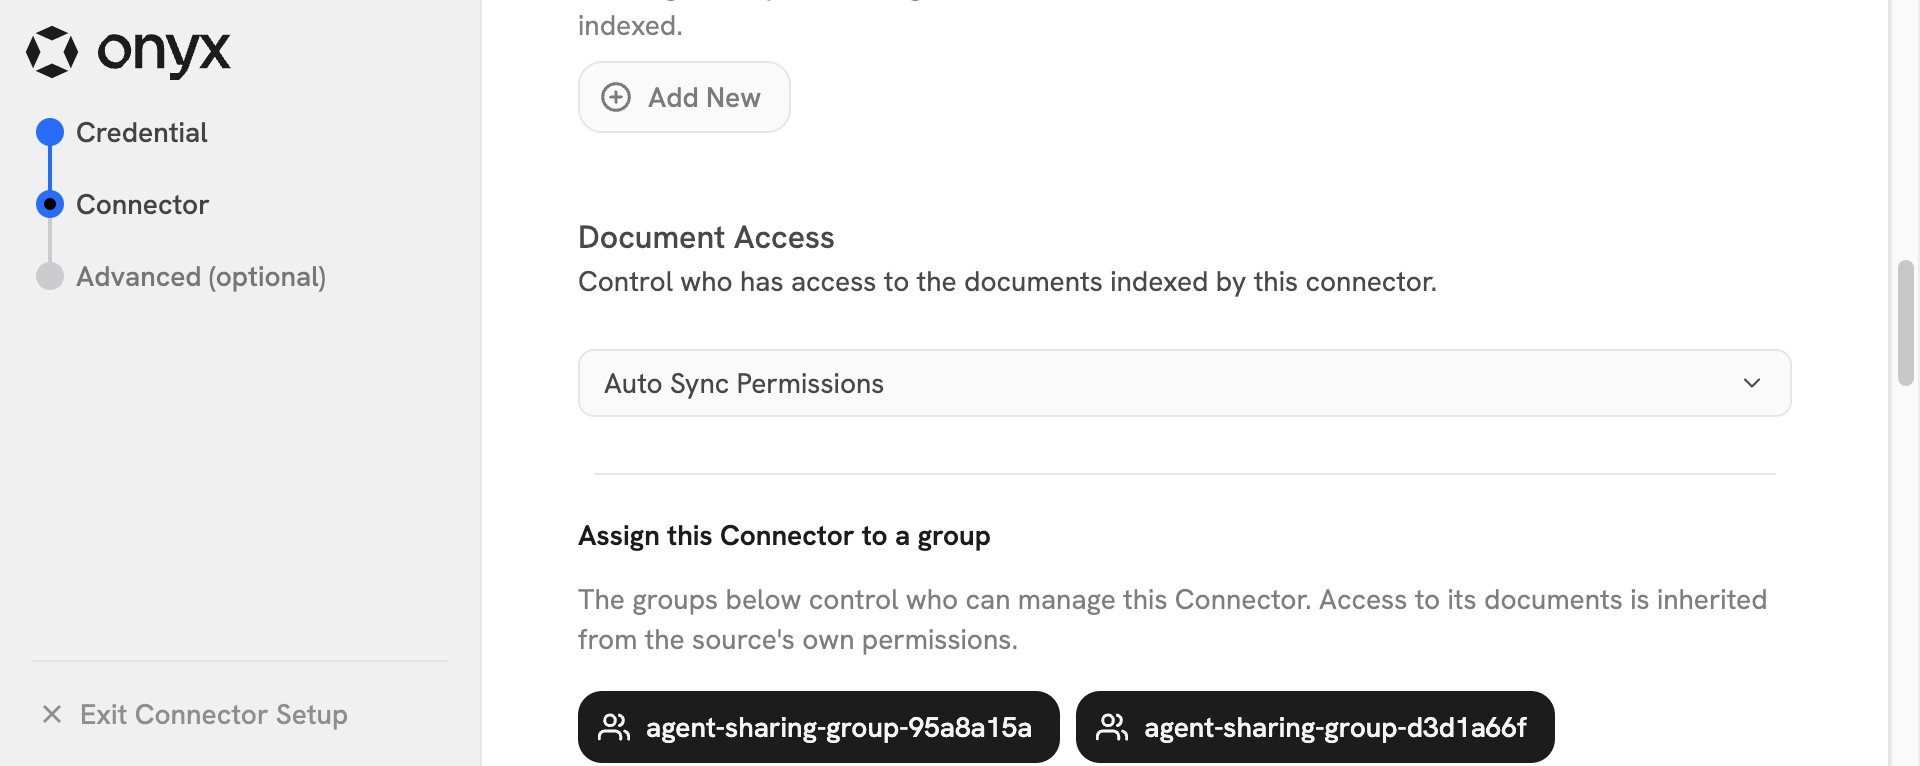
 Select **Public**, **Private**, or **Auto Sync Permissions**.
Select **Auto Sync Permissions** to inherit Jira project access.
Select **Public**, **Private**, or **Auto Sync Permissions**.
Select **Auto Sync Permissions** to inherit Jira project access.
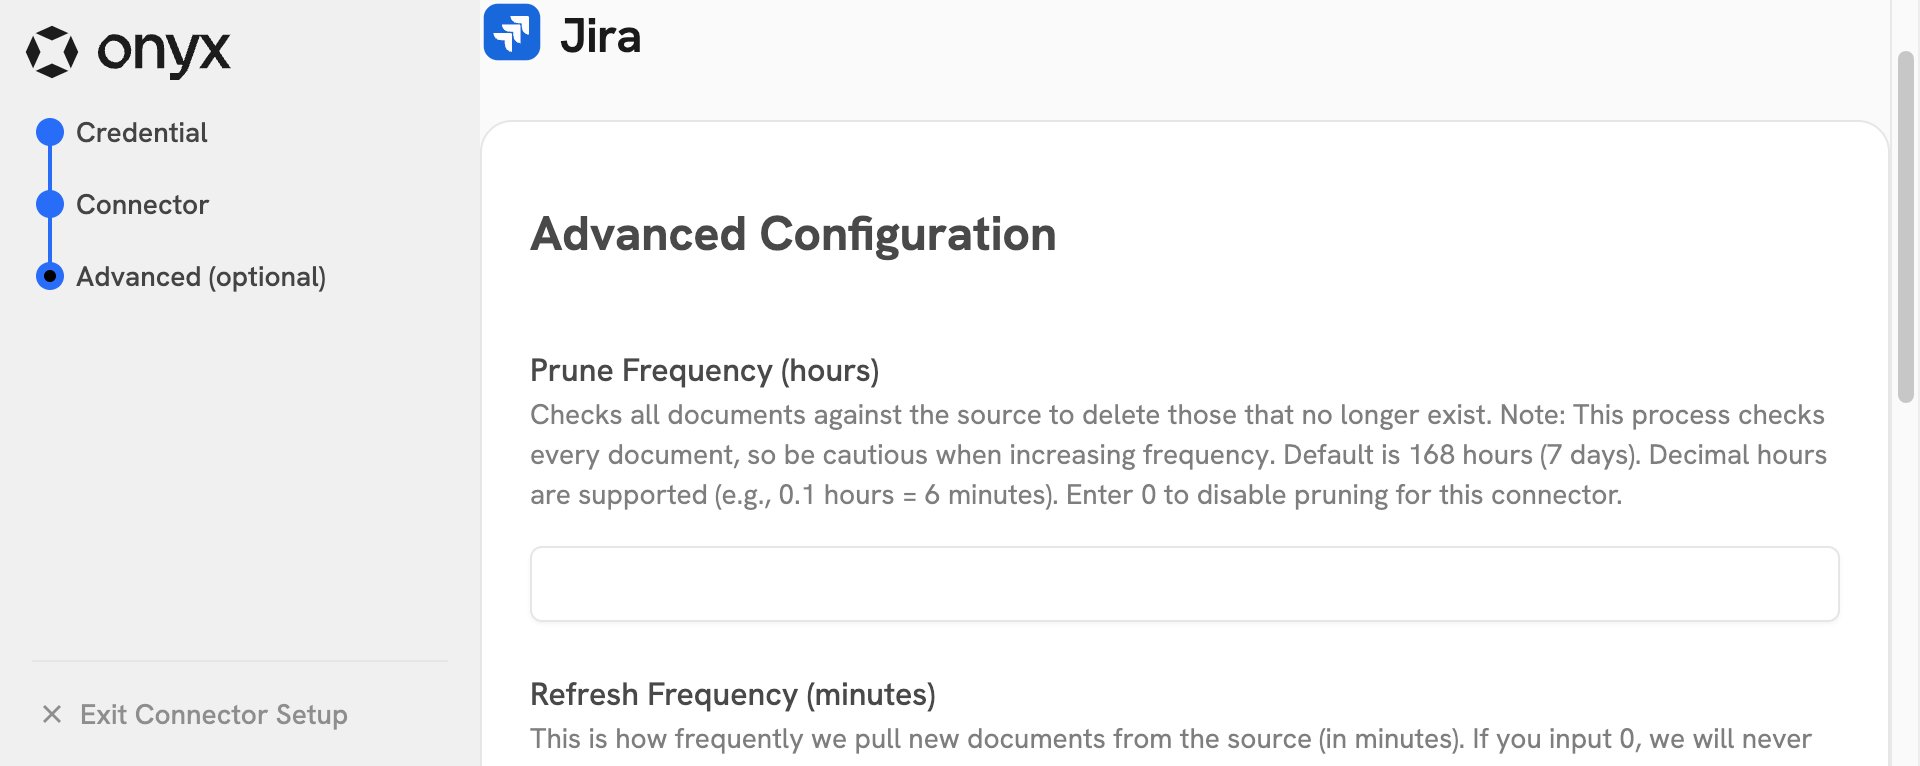
 Select **Advanced** to change the prune frequency, refresh frequency, or indexing start date.
 Select **Create Connector**. Onyx starts indexing the Jira issues that match your configuration.
### Indexed metadata
```
- Issue Key
- Priority
- Status
- Resolution
- Labels
- Created
- Updated
- Due Date
- Issue Type
- Resolution Date
- Parent Issue Key
- Project Name
- Project Key
- Reporter
- Reporter Email
- Assignee
- Assignee Email
```
This documentation is built and hosted on [Mintlify](https://mintlify.com), a developer documentation platform.
Select **Create Connector**. Onyx starts indexing the Jira issues that match your configuration.
### Indexed metadata
```
- Issue Key
- Priority
- Status
- Resolution
- Labels
- Created
- Updated
- Due Date
- Issue Type
- Resolution Date
- Parent Issue Key
- Project Name
- Project Key
- Reporter
- Reporter Email
- Assignee
- Assignee Email
```
This documentation is built and hosted on [Mintlify](https://mintlify.com), a developer documentation platform.