

How it works
Onyx reads pages and database content that you share with a Notion connection. Leave Root Page ID blank to index all accessible pages, or set it to index one page and its children. Onyx checks for content changes on the connector’s refresh schedule. The default refresh interval is 30 minutes. Indexing time also depends on workspace size, API limits, and the indexing queue. A refresh interval does not guarantee that changes appear within that time. Without a root page, Onyx uses Notion’s search API and fetches pages edited within each indexing window. With a root page configured, Onyx traverses that page and its children on each run.Before you begin
You need an Onyx administrator account and a Notion internal connection token. If you need a new connection, ask a Notion workspace owner to create it. You also need permission to share the target pages with that connection. Workspace members can share pages with an existing connection when their page permissions and workspace policies allow it. Enterprise workspace owners can restrict who manages connection access.Notion now calls integrations connections. The current flow uses New connection and Access token.
The token may also be labeled Installation access token or Internal Integration Secret.
Get your Notion credentials
Create an internal connection
1
Open Notion's developer portal
Sign in to the Notion developer portal
with your workspace owner account. Select New connection.
2
Choose access-token authentication
Enter a name such as 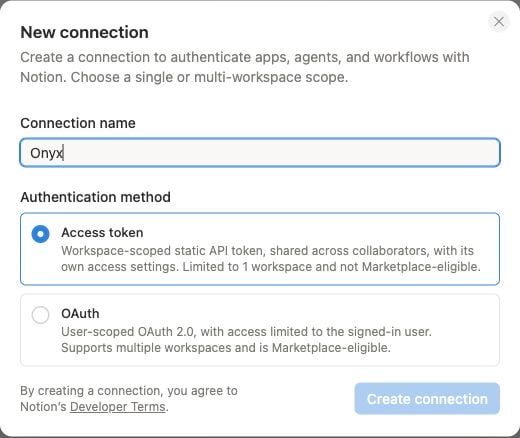
Onyx. Select Access token as the authentication method,
then select Create connection. Choose the workspace you want Onyx to index during setup.3
Set read access
Open the connection’s capability settings. Enable Read content and save your changes.
Onyx does not need Update content or Insert content to index pages.
4
Copy the access token
Open Configuration. Under Integration token, copy the Access token.
Older screens call this Internal Integration Secret. This is the value you will paste into Onyx.
Reuse an existing connection
In Notion, open your workspace menu and select Settings → Connections → Manage → All connections. Find the internal connection. Open its ••• menu and select Manage connection. Under Copy access token, select Copy. You can also open Developer portal to view its configuration. Do not select Refresh to copy an existing token. Refresh generates a new token and can disrupt existing connectors. See Notion’s internal connection authorization guide for the token location and its connection capability reference for permission details.Give the connection access to pages
Creating a connection does not give it access to all workspace content. Share the pages and databases you want to index. You can also manage shared pages in the developer portal under Content access → Edit access.1
Open a page or database in Notion
Open the original page or database that you want Onyx to read.
2
Add the connection
Open the ••• menu at the top right. Under Connections, select Add connections or + Add connection.
Search for the connection you created, select it, and confirm access.
3
Check the content scope
Access to a parent page includes its child pages. Repeat this process for other top-level pages you want to index.
For databases, share the source database, not only a page containing a linked view.
Sharing a database also gives the connection access to its row pages and their children.
Onyx indexes accessible content within the configured root-page scope, if one is set.
Add the credentials in Onyx
1
Open the Notion connector
Open Admin Panel → Add Connector and select Notion.
2
Create a credential
Under Select a credential, select Create New. Enter a descriptive credential name if prompted.
Paste your Notion token into Notion Integration Token, then select Create. Paste only the token,
without a 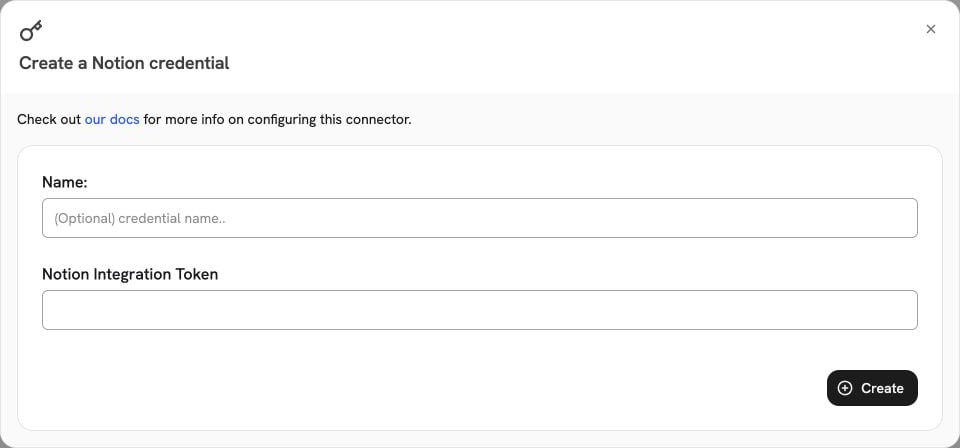
Bearer prefix or quotation marks.If you already saved a credential for this workspace, select it instead.3
Configure the connector
Select Continue to open the configuration step. Give the connector a name, such as
Notion Knowledge Base.
Set Root Page ID only if you want to limit indexing to one page and its children.To find a page ID, copy its Notion link. Use the 32-character ID at the end of the URL path,
before any
? query string. For example,
https://www.notion.so/Team-Wiki-0123456789abcdef0123456789abcdef has the page ID
0123456789abcdef0123456789abcdef. Enter the ID, not the full URL.The root page must still be shared with the connection in Notion.4
Review access and indexing options
Review who can access the indexed content in Onyx. Public content is available to all Onyx users.
Use the available restricted-access options for content with a smaller audience.
Do not assume that sharing a page with the Notion connection preserves each user’s Notion permissions in Onyx.Select Advanced to review the refresh interval and pruning settings.
Select Create Connector to save the connector and start indexing.
Verify indexing and use your content
1
Check the indexing result
Open Admin Panel → Existing Connectors and select your Notion connector. Wait for an indexing run to finish.
Check the document count and any reported errors.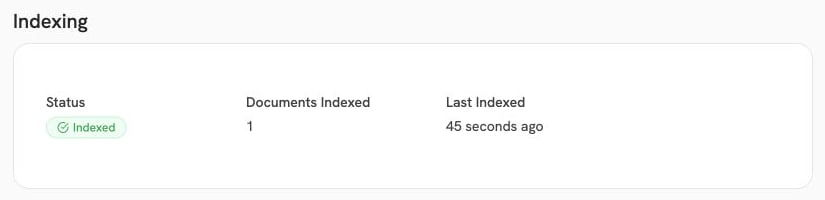
2
Find a known page
Return to Onyx and search for a distinctive phrase from a shared Notion page.
Use an agent with access to the connector’s documents. Check the source citation and open the linked Notion page.
3
Limit an agent to selected content
To give an agent a specific collection, create a document set under Admin Panel → Document Sets.
Include the Notion connector and select that document set in the agent’s knowledge settings.
Troubleshooting
To stop fetching a page, remove the connection’s access in Notion or narrow the root-page scope.
Previously indexed documents are not removed immediately when you change Notion access.
Enable pruning and check that a pruning run succeeds to remove documents that are no longer accessible.